Hiked: 3/10/2015
Distance: 1.7 miles round trip cross country
Summit Elevation: 4280'
Prominence: 360'
Elevation Gain: 570'
Elevation Gain (in Empire State Buildings): 0.45
Round trip time: 1 hour
Recommended water: 16 oz.
Parking/Fees: $15 National Parks (one vehicle, good for a week)
Difficulty: Easy
Malapai Hill is #23 on the Lower Peaks list and another very short hike. The trailhead is seven miles down Geology Tour road, a dirt road in the middle of Joshua Tree National Park. The road is in mostly good shape and despite a warning sign, it can be driven without high clearance or 4WD. The best place to park is at mile marker #7 where there is a small turnout. The hike is all cross country, but very easy going. The cactus and shrubs are sparse making it easy to pick your way through without unwanted contact. Malapai Hill looks dark from a distance and is covered in places with dark brown basalt talus. While the ascent is somewhat steep, you shouldn't need to use your hands. The only trick is to navigate the loose talus without slipping or twisting an ankle. I headed toward the saddle, then climbed a little right of center, though any path is as good as another. I found a register on top and signed in, but once again no benchmark. There is a lower bump to the south that Caltopo named Malapai BM, so after taking some pictures from the summit, I headed over to Malapai BM, where I still didn't find a benchmark. A few small cairns had been tossed together, but otherwise, there was nothing to see. I headed down more directly from the saddle across more talus and was back at my car in an hour. Even though it is in the middle of Joshua Tree, I never quite got the same feeling of being in the wild that I do in Anza-Borrego. I don't mean to diminish the charm of Joshua Tree. I've never seen any place better for bouldering and rock climbing.
Hiked: 3/10/2015
Distance: 2.5 miles round trip on trail
Summit Elevation: 3440'
Prominence: 120'
Elevation Gain: 500'
Elevation Gain (in Empire State Buildings): 0.40
Round trip time: 50 minutes
Recommended water: 16 oz.
Parking/Fees: $15 National Parks (one vehicle, good for a week)
Difficulty: Easy
While in Palm Springs for a tech conference, I wanted to take advantage of daylight savings time and proximity to Joshua Tree to try to mop up the Sierra Club lower peaks in the park. Some of the hikes are very short, like this one to Mastodon. It is a 2.5 mile loop with very little gain, but it surprised me by packing a lot of great views, an interesting mine, and a fun scramble at the summit. It starts near the Cottonwood Springs campground at a parking lot at the end of Cottonwood Springs road. The Lost Palms trail is well signed and groomed, and about a mile down the trail branches left to Mastodon. The loop continues past the summit, then down a wash and back to the road. When you get to the base of the Mastodon summit, you can charge it directly for some class 3, or follow the use trail around to the north side for an easy class 2 scramble. I didn't find a benchmark or register around any of the high points. After I spent a few minutes on the summit, I returned to the loop and it led by the Mastodon Mine ruins. The mine itself is blocked off to protect people from themselves, but the ruins were nice highlight. This would make a nice family hike. If you want to make it a longer, you can continue down Lost Palms trail to the Lost Palms Oasis instead of taking the side trail to Mastodon, about a 7 mile out and back, or a little over 8 if you did the oasis and Mastodon. It felt great to be back in the desert.
Mastodon Peak from Cottonwood Springs Road
Start of the Lost Palms trail
Sign at the junction to Mastodon
Approaching the summit
Looking south from the summit
A fine looking chuckwalla basking in the sun
Another shot, I tried to get closer and he mistook me for a predator
Hiked: 3/6/2015
Distance: 1.5 miles round trip on trail
Summit Elevation: 2350'
Elevation Gain: 350'
Elevation Gain (in Empire State Buildings): 0.28
Round trip time: 45 minutes
Recommended water: 0 oz.
Parking/Fees: $8 Glen Helen Regional Park
Difficulty: Easy
As I was coming down from Mt. San Antonio, my calf felt like it loosened up. Since I had some extra time, I checked Peakbagger.com for a nearby small peak and found Mormon Battalion Mountain at the tail end of Lytle Creek Ridge near Ranch Cucamonga. There were multiple ways up, but perhaps the least controversial way was from Glen Helen Regional Park. I tapped the address into my phone and paid the unexpected $8 parking fee (per vehicle). I think it was $10 if you wanted to fish. The San Manuel Amphitheater is in the park and there was a small waterpark there as well (closed for the winter).
I drove down Glen Helen Park road and veered toward the based of the mountain until I hit a locked a fence. I parked on a small dirt road there. The fence only goes a short distance right of the road and there was a use trail that went around it. Then, I hiked down the road until I found a gully with a wide trail heading up to a saddle. From the saddle, it was short climb to a series of three bumps, with the middle one being the obvious high point and summit. There were several metal markers just off the road at the actual high point. Since this area sits near the Cajon Pass, the wind was blasting on top. My best guess is 50-60 mph. It whipped the loose straps from my pack against my head and back and I had to hold my hat or lose it. I checked out all the bumps, then reversed course and was back in my car in 45 minutes. Not much of a hike, but my only consolation after giving up on the Mt. San Antonio winter attempt.
The fence ahead and Mormon Battalion Mountain in the background
Hiked: 3/6/2015
Distance: 7.1 miles round trip on trail
Summit Elevation: 10064' (3067m)
Highest Elevation Reached: 8202' (Ski Hut)
Elevation Gain: 2260'
Elevation Gain (in Empire State Buildings): 1.80
Round trip time: 4 hours
Recommended water: 64 oz. (96 oz. for successful trip)
Parking/Fees: Adventure Pass
Difficulty: Strenuous (for successful trip)
One of my goals this year was to climb Mt. San Antonio in the snow. I wanted to duplicate Rod's hike up Devil's Backbone from the notch. However, because I had to be back early, I could not wait until the ski lifts opened and had to take the longer Ski Hut Trail. I started from Manker Flats at 6:00 AM and there was already enough daylight to skip a headlamp. The road was clear and I didn't expect to hit any serious snow until after the Ski Hut.
The temperature at the trailhead was in the mid-40s, and the forecast for the summit was low 30s with a wind chill in the low 20s. There was already a steady 10-20 mph wind at the trailhead. I got everything prepped and started up the familiar road. For some reason, I zoned out at the Ski Hut trail junction and continued up the dirt road toward the notch. I've been on the this trail 5 times and know it well. When I realized I had passed it, I returned and with a small amount of focus picked it up. I was moving slower than usual. To protect my hands from the cold, I was sporting new Black Diamond gloves and they were doing their job. They were also stiff and made it hard to operate my camera and everything else. I didn't hit any snow or ice on the trail until around 7000'. Then, patches of ice of varying lengths appeared frequently. My plan was to work around the patchy ice and break out the crampons at the Ski Hut. As I gradually warmed up, I started to get too warm, so I stopped to take off my fleece layer. When the Ski Hut was finally in sight, I got a couple of twitches in my right calf. I didn't pay them any mind until it went full cramp just below the Ski Hut. I continued slowly up to the Hut itself and sat down in the small sheltered porch area to get out of the wind, which was a steady 20-25 mph. I thought I'd see how it felt after a little rest. I fumbled around for food and got the crampons out, but before it was time to put them on, the calf cramped again. Since the hardest half of the hike was ahead, I decided not to push it and packed up to head down. As I worked my way down, I passed a fair number of hikers headed up, but could only give them beta up to the Hut.
This hike convinced me that I perform poorly in cold weather. It doesn't seem to be a winter skills deficit, and skills can be acquired in any case. It seems more like a physiological thing. This was my first calf cramp during a hike. It just hasn't happened, except this time, in the cold. Looking back on other cold hikes I've done, my performance has consistently been poor. I've tried compensating for this with better gear, but it hasn't made much difference. I need to rethink how I plan cold hikes in the future...and how often.
Snowy Mt. San Antonio from the start
The Ski Hut, the only shelter along the trail, locked up tight
Telegraph Peak (left), and Cucamonga Peak (center) from the Ski Hut
San Antonio Falls running strongly, taken on the way down
Hiked: 2/20/2015
Distance: 7.3 miles round trip on trail and cross country
Summit Elevation: 3342' (high point at trailhead)
Elevation Gain: 1331' (loss then gain)
Elevation Gain (in Empire State Buildings): 1.06
Round trip time: 7 hours
Recommended water: 124 oz.
Parking/Fees: Adventure Pass
Difficulty: Very Strenuous and Dangerous
Tanriverdi Falls (or Tanrierdi) is one of the crown jewels of the Santa Ana Mountains, and probably seen by only a handful of people each decade. There is no easy way to get there. I considered the long approach from the bottom of Hot Spring Canyon, coming from Chiquito Basin (heavy poison oak), Los Pinos ridge, and the north ridge of Old Sugarloaf, but decided descending from the top of the canyon was still the best. Note: canyoneering site ropewiki also refers to this as Salamander Canyon. Jerry Schad's Afoot and Afield in Orange County covers the hike from the bottom, a 10 hour round trip according to his write up. It also covers the hike to the second waterfall from the top, but not the wild mid-canyon section below it. Here is a part of his description:
Being in excellent physical condition, having considerable experience in cross country travel over rugged terrain, and possessing good judgement do not automaticaly guarantee that you'll be able to reach the falls and return without mishap. You must be cautious, patient, and determined too. Hazards include slippery rocks (some concealed by leaf litter), prickly vegetation, and literal forests of poison oak.
I had hiked to the second waterfall in 2013 and scouted above it. The difference this time was the conviction to make it to the big falls. I would not recommend making an attempt without conviction. It is difficult and dangerous and for about an hour I was genuinely concerned that I would not make it out.
North ridge of Old Sugarloaf clogged with chaparral (scouted by Gimpilator, thanks!)
Long Canyon Road was open again and the first part was newly paved and smooth. I parked at the Falcon Campground and got ready for a fight. The pants, shirt, and socks I had on had been treated with Permethrin, a kill-ticks-on-contact chemical that you aren't supposed to spray on while wearing the clothes being treated. Serious chemical warfare. I added long gaiters, gloves, and a fleece for more brush protection. The easy part of the hike to the second falls was familiar and went quickly. I found 5 ticks on me getting to the second falls, the last one seemed to drop off on its own. The permethrin may have killed it. I decided to call the second falls "Gut Check Falls", because nothing comes easy after that. For the other falls, I used the names from the canyoneer trip report on Summitpost.org, matching up what I saw with their pictures and descriptions as well as I could. Most of the rocks in the canyon are worn as smooth as glass from the water so down climbing big falls was a non-starter. I followed a faint use trail on the right to bypass "Gut Check" and thought about descending back to the canyon, but I knew the "Single Track Falls" bypass would be required almost immediately so I stayed high on the wall trying to follow the occasional animal trail. This was very difficult as the brush got thicker. I traversed across a side canyon looking for a way to descend. I found a way to the bottom of the side canyon, then fought through hellish brush to get back to Hot Spring Canyon. What made the bushwhacking so bad was not just the native growth, but the years of run off that filled the side canyon. Small trees, boulders, and debris mixed with the native plants to create an unholy jumble. I used the machete to hack some areas, but overall, it was a negative, getting caught on things as I tried to pass under. The tick problem went away, probably because I was in such dense brush that the deer were not stupid enough to wade through. No deer, no ticks.
Algae in the canyon
Upper Hot Spring Falls
Easy obstacles at the start
Gut Check Falls (2nd falls)
Top of Single Track Falls
Bottom of Single Track Falls (from high on the wall)
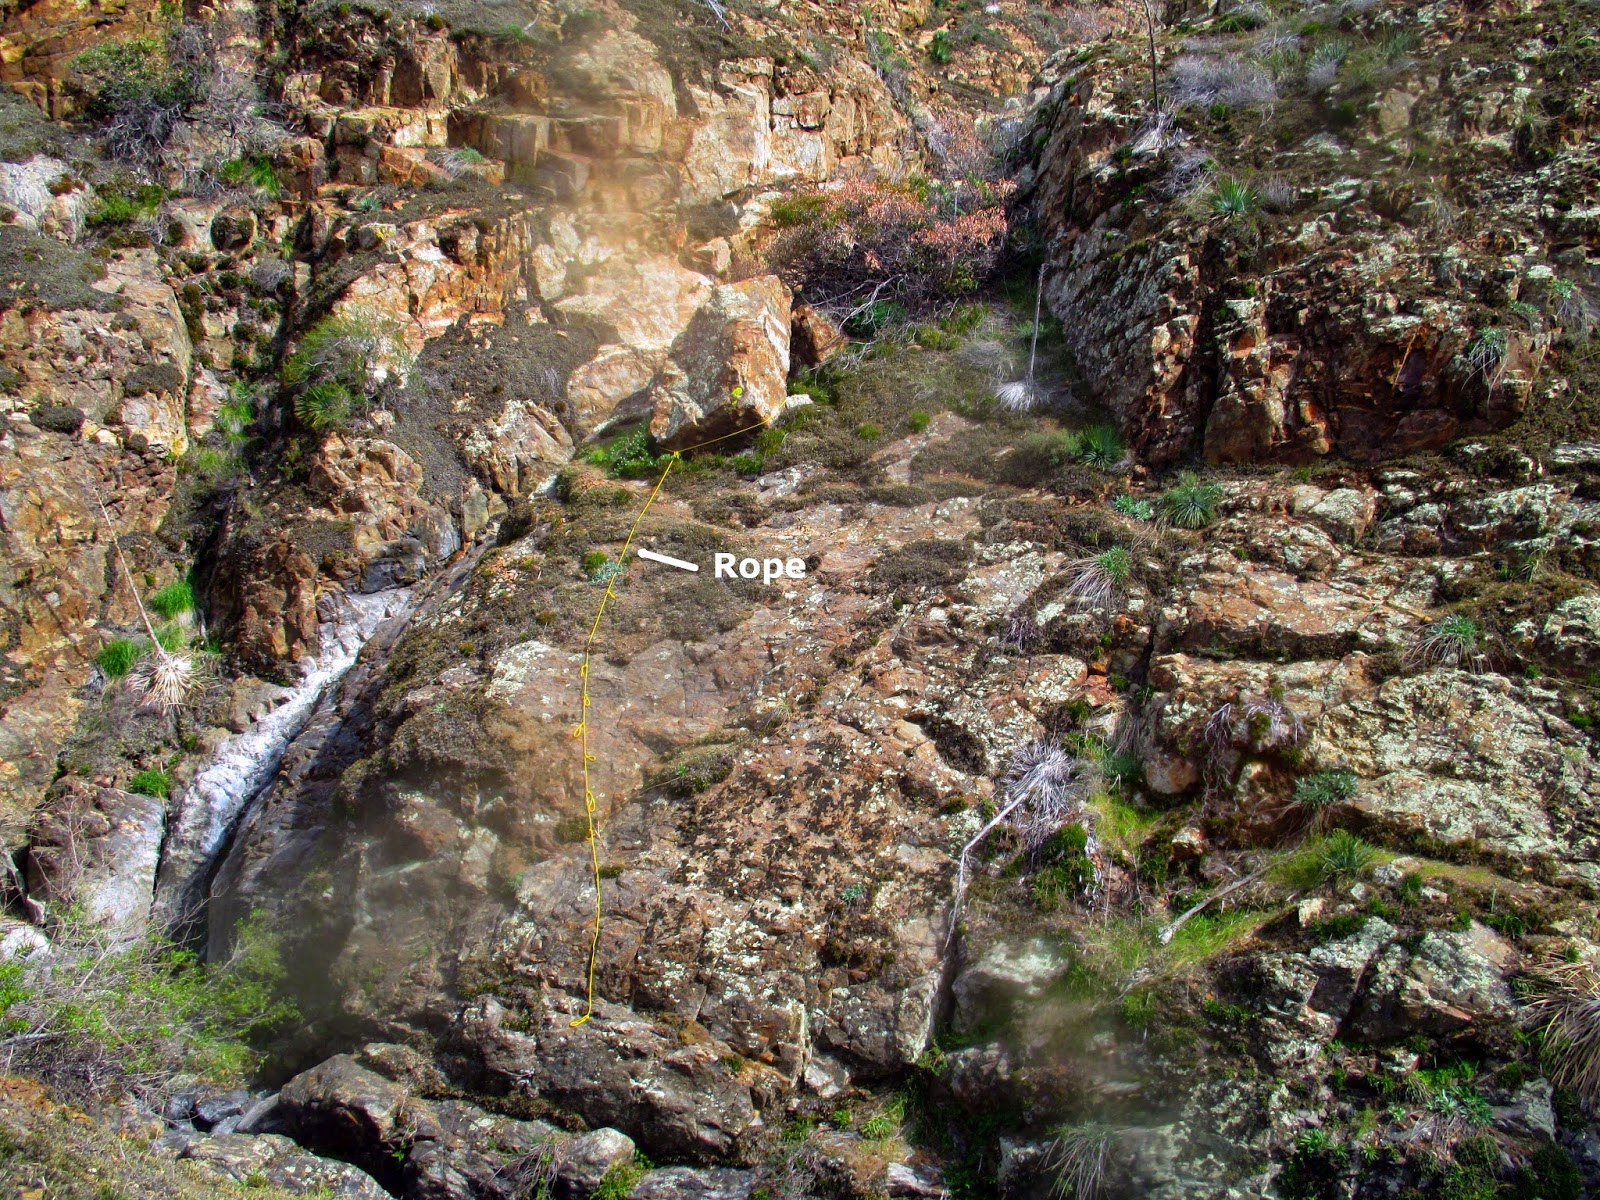
On the way back, I spotted this fixed rope on a boulder below Single Track Falls. I was not sure I could trust it, and not sure I could make it past the falls even if I made it to the boulder, so I continued up the canyon wall on the left.
Once I was back in the right canyon, I started running into large patches of poison oak, a lot of it I could not avoid. Most of the other large waterfalls I encountered had some kind of bypass on the left or right, but for some I had to force my way up the canyon wall, often with class 3 scrambling, and back down. I was now moving at a crawl, about 1/2 mile per hour. The route finding was very difficult. For each bypass I found, I thought about turning back, wondering if I could reverse my path on the return. But I kept going, hoping each new waterfall would be Tanriverdi Falls. Finally, the canyon started to clear out a little and I could sense Tanriverdi was near. It was quite a thrill to reach it, even though only a trickle was flowing over. I had to find one final bypass to get around a 20' waterfall I dubbed "Preview Falls" just before the big 160' drop. There is another drop on the bottom tier. I found the webbing left behind by the previous canyoneers around a boulder, used to make the huge rappel. I took photos, ate something, then started thinking about getting out. It had taken me 3.5 hours to reach the big falls, and I expected it to take at least as long to get out.
Tangled brush I swam through to get back to the main canyon
Sled Falls with a fixed rope
Top of Dread Lock Falls
Bottom of Dread Lock Falls. The image is blurred from debris and sweat on the lens.
Ohh Baby Pool
Had to jump across here, bypass shown on left
BJs Landing
Final 20' waterfall before Tanriverdi
Tanriverdi Falls
Webbing used by canyoneers to rappel Tanriverdi
Presenting the big falls
You know I've been to the edge, there I stood and looked down
Broken trekking pole, how I felt after the hike
I was not happy with the bushwhacking I had to do coming down, so I decided to stay in the canyon as much as possible on the way back. This meant dealing with even more poison oak, which was not growing on the walls. I am pretty sure I was slapped in the face by some poison oak vines on the way out. I scrubbed my face with cold water and Technu as soon as I got home, but time will tell if I have to cope with that. I was pleased that I found the bypasses on the way back that I had figured out on the way down. Of course, I eventually ran into some waterfalls where I had to fight up the canyon walls again, but in a decidedly different place than before. I climbed as high as I needed to feel safe before traversing across the side canyons and continued following any faint animal trail I could find. I checked my GPS to see if I had passed Gut Check Falls and saw that it was about 0.2 miles upstream.
Here is where things went sideways. At my location on the wall, the chaparral was nearly impassable. I looked for a lower animal trail and would struggle down to it only to find it quickly ended in another impassable snarl. Then, I fought up again only to be blocked. This happened several times before I got concerned. I didn't seem to have any way forward. With my energy draining quickly, I decided my only option was to get back to the canyon floor and hope I didn't cliff out. The brush was worse than the hellish mix I faced on the way down. The machete would not have been effective against the small trees I faced. I could not take useful steps so I essentially somersaulted over the top crashing into wherever I landed. The wall was steep so I had to be careful to not tumble over the edge. This was effective at getting out of the worst of it and as I neared the edge, I was lucky to find a way to down climb to the canyon floor. I thought I would have to face at least one more bypass but soon it became clear that I had emerged above Gut Check Falls and would have an easy climb out. I was quite a mess at this point, bleeding in at least 7 places. I felt bruised on all limbs and had multiple hits from yucca and random thorns. As I was almost out, I met three hikers heading down who asked me if they were almost to the waterfall. I told them there were at least 9 waterfalls, but they should stop at the second. I hope they took that advice.
This was the toughest route finding I have ever faced, the nastiest bushwhacking, and probably the most dangerous hike I've ever done. Was it worth it? Maybe, but only because I got out alive. Looking back, there are two things I would have done differently. One, I would get back in the canyon right after Single Track Falls. Two, I made a mistake staying on the wall too long on the way back. Eliminating those two mistakes would have made my life much easier. Fair warning, I still can't recommend this hike, unless you crave danger with a side of masochism. It is probably easier to rappel down many of the falls than bypass them, so come get it, canyoneers. I am done.
Update 2/26/2015: Despite my precautions, I am nursing several poison oak rashes. Both wrists where skin was exposed between my gloves and shirt sleeve, a small section on my lower back, one spot on my neck and my right ear.