Sunday, August 23, 2015

Cloudripper and Vagabond Peak

Hiked: 8/22/2015
Distance: 13.6 miles round trip on trail and cross country
Summit Elevation: 13525' (Cloudripper), 13374' (Vagabond)
Prominence: 845' (Cloudripper), 334' (Vagabond)
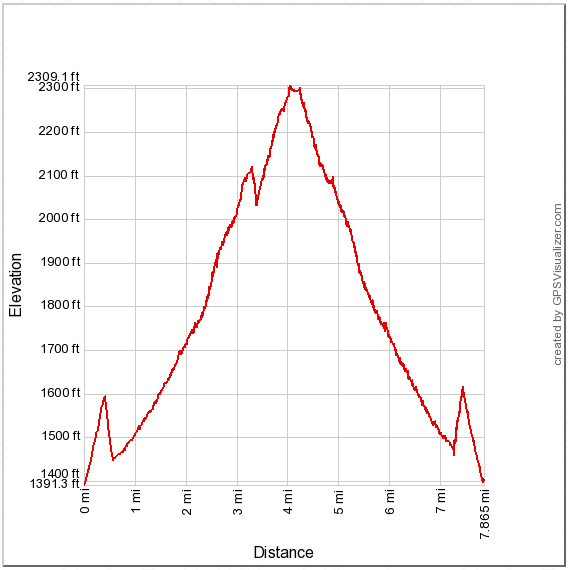
Elevation Gain: 4710'
Elevation Gain (in Empire State Buildings): 3.76
Round trip time: 10 hours
Recommended water: 200 oz.
Parking/Fees: Free at South Lake
Difficulty: Very Strenuous

Cloudripper is the highest peak of the Inconsolable Range in the Eastern Sierra. It towers over the Chocolate Lakes, Thunder and Lightning Lake, and the Big Pine Lakes. It offers arguably some of the best views in the Sierra. Dima and I drove up the day before and got to the trailhead at South Lake around 6:20 AM. There are two trails that head out from the parking lot. At the north end of the lot is the main trail that descends toward Parchers Resort and intesects the Green Lake Trail. On the south end of the lot is a trail that heads north and south. The south trail heads to the Chocolate Lakes and the north trail merges into the main trail, but also offers a shortcut following a pipeline that intersects the Green Lake Trail about 400' higher than the main trail. We took the main trail on the way out and the pipeline shortcut on the way back.

The Green Lake Trail is fairly steep to start, and switchbacks up to Brown Lake before getting to Green Lake. To help deal with the altitude, we set a measured pace. Dima was capable of going faster but hung with me most of the hike. Brown Lake turned out to be nice and we took a few moments for a closer look. About a mile further up was the much larger Green Lake at 11000'. There we met a family that was camping at the lake and their attack dog Lucy. Lucy turned out to be harmless. From Green Lake, Vagabond Peak rose like a spike in the distance and looked quite impressive. To get to Cloudripper, you need to go over Vagabond. We continued around the lake on the trail that climbed to Coyote Ridge. Once we hit the ridge, we followed the trail and tried to figure out where to leave it and head for Vagabond. This is where the difficult part began.


Intersection with the Green Lake trail


First glimpse of Vagabond Peak, farthest peak in view


Reflection in Brown Lake


Green Lake


Vagabond from Coyote Ridge, looking distant and unworkable

After leaving the trail, there are two brutal sections of boulder/scree scrambling. The first is about 500' and gets you to a plateau where you can see the full might of Vagabond. The second is about 700' to get to the summit of Vagabond. I picked a point to tackle the first 500' section while Dima continued over to check out the ridge line. He ended up looping back to my right after the ridge didn't pan out and we met at the top of the first section. We decided to tackle Vagabond by first heading slightly right, then directly to the summit. The direct ascent to Vagabond started as light boulder hopping, but ended in some exposed class 3. Dima got to the summit ahead of me and located the register in a hole on the underside of the summit block. We both signed the register and put it back in the hole. The summit was too exposed to consider a photosphere. Next, we had to find a way to descend about 400' of boulders to the saddle with Cloudripper, then climb another section of boulders to the Cloudripper ridge. There were two ill defined gullies, I followed the right one. Dima started further right on a more rocky section. I think that was probably better, since I skidded around and dislodged both small and large boulders on the way up.


First view of Cloudripper lurking behind Vagabond


Thunder and Lightning Lake, Skyhaven behind


Approaching Vagabond


Looking for the best route to the Vagabond summit


On the summit of Vagabond


The hole in the summit block where the Vagabond register lives


Cloudripper from Vagabond summit

The climb to the Cloudripper ridge led to a false summit, then a class 3 climb up and across a narrow ledge. As with Vagabond, Dima pulled ahead of me, and when I reached the false summit, he was already on top as a group of other climbers were coming down. After the other group cleared the summit, I cautiously made my way over on good rock. The final climb was not overly difficult, but the exposure on both sides was dramatic and unnerving. The summit boasted a newer looking wooden sign and the register was in a shiny metal tube. The views did not disappoint, despite the smoke that still choked the area. The Palisade crest loomed to the south hugged by a few remaining glaciers. Chocolate Peak and the Chocolate Lakes were small and distant. There were giant mountains and beautiful lakes in all directions. We both had some photo malfunctions. I had damaged my camera on the warm up hike the day before and was relying on my phone. My camera app crashed while on the summit and would not load, requiring a reboot. I found out later I lost several pictures. Dima's camera ran out of battery power and he did not get all the pictures he wanted. After taking in the panorama, we started back. We had to reverse the boulder slogs down Cloudripper, back up the Vagabond ridge, saving maybe 100' of gain, back down Vagabond and the other 500' section. It was nice to get back on the trail. We made good time coming down from Green Lake and followed the pipeline shortcut back to the car. The pipeline trail required us to walk on the pipeline more than expected, so it became kind of a balancing act, but saved time and gain on the way back.


Climbing up to the Cloudripper ridge


The summit from near the top of the ridge


Dima on the Cloudripper summit while the other group descends


Palisade Crest from Cloudripper


Big Pine Lakes


Getting near the summit


Summit sign, register tube was under the boulder in front of the sign


Chocolate Peak and Lakes


Looking back at the jagged summit ridge


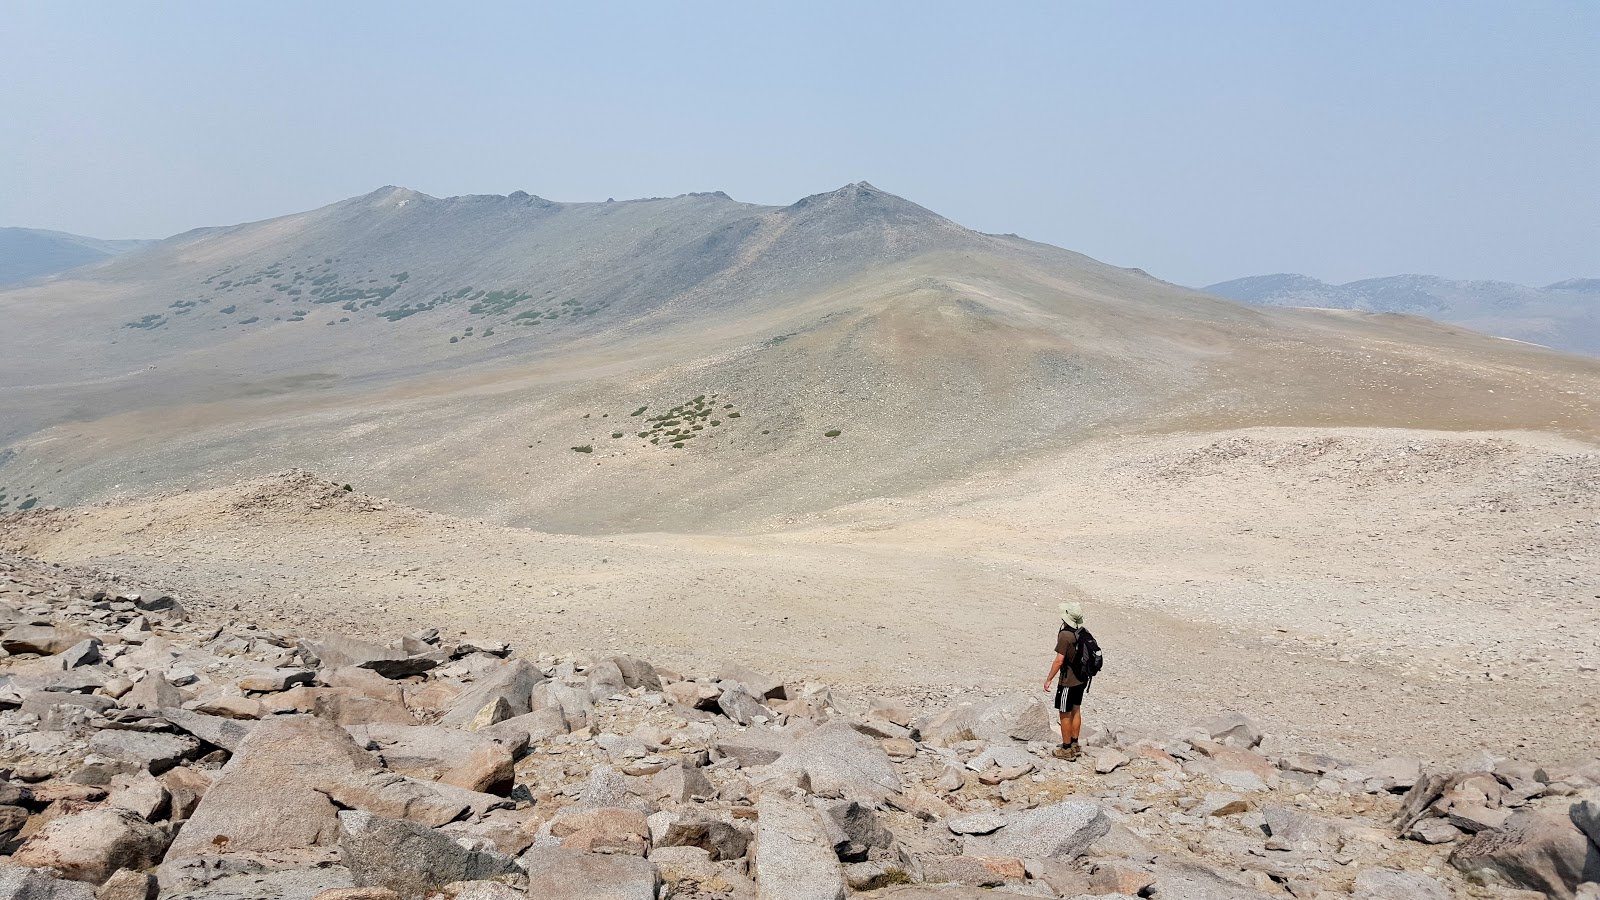
Dima descending the last cross country section, The Hunchback in the distance


Taking the pipeline shortcut back to South Lake


Dima recovered a partially decomposed marmot skull on the trail, cleaned it up, and named it Rupert


This was only my third trip to the Sierra Nevada mountains. One of those trips was to climb Mt. Whitney. When you see the Sierras, you know these are the E-ticket rides in California. While the physical stats don't match the Whitney main trail, I felt this hike was overall more difficult. Almost half of the trip is cross country where you have to do more than put one foot in front of the other on a trail. Each of these peaks is over 13000' and had class 3 sections, exposed in places. Difficulty is very subjective, but it seemed tougher to me.


Saturday, August 22, 2015

Trail Peak

Hiked: 8/21/2015
Distance: 7.1 miles round trip on trail and cross country
Summit Elevation: 11622'
Prominence: 885'
Elevation Gain: 1775'
Elevation Gain (in Empire State Buildings): 1.44
Round trip time: 3 hours 40 minutes
Recommended water: 84 oz.
Parking/Fees: Free at Horseshoe Meadow
Difficulty: Moderate

As a warm up for Cloudripper, Dima and I stopped at Lone Pine and drove up to Horseshoe Meadow to climb Trail Peak. We started before the main parking area and followed the trail down into the meadow, heading toward Trail Pass. We skimmed the tree line, lost the trail for a while, and headed up a drainage in the general direction of the pass. Somewhere in the drainage, I dropped my camera leaving a large scratch in the lens. Another one bites the dust, which is why I don't bring expensive cameras on my trips. With the camera out of action, I fell back on my phone and had to rely on it the next day. Soon enough, we crossed the trail again and followed it. As we headed up, a mule train led by two forest rangers met us on the way down. They were friendly enough, but we had no idea what they were doing. We rested briefly at the pass, then followed the trail about another quarter mile before leaving it and heading up the ridge. It was steep but very pleasant going for cross country travel. The ground was covered in places with pine needles and cones, but there was no dense vegetation or obstacles. The steepest section ended at about 11300', then there was a more gradual slope with larger boulders to navigate. In another third of a mile, we reached the summit block, an easy and short class 2 scramble. Our otherwise fine views were diminished by smoke from an active fire burning in the Golden Trout Wilderness. We were still able to make out Cirque Peak and Mt. Langley. There was a benchmark on the summit, but we could not find a register. On the way down, we decided to follow the trail around to the other side of Horseshoe Meadow and back through the main parking area to complete a loop.


Starting down the trail toward Trail Peak


Trail Peak in the distance


Intersection at Trail Pass


Off trail heading toward Trail Peak


Approaching Trail Peak


Trail Peak benchmark


Dima and I on the summit of Trail Peak


Horseshoe Meadow and Mt. Langley in the distance through the lingering fire smoke


Hollow tree on the way back


Smoke apocalypse on the way to Bishop, CA


Saturday, August 8, 2015

Harding Canyon Falls

Hiked: 8/7/2015
Distance: 7.9 miles round trip on dirt road, use trail, and cross country
Summit Elevation: 2309' (Top of falls)
Elevation Gain: 1280'
Elevation Gain (in Empire State Buildings): 1.02
Round trip time: 4 hours 30 minutes
Recommended water: 88 oz.
Parking/Fees: Free at Tucker Wildlife Sanctuary
Difficulty: Moderate

This waterfall hike starts on Harding Truck Trail at the Tucker Wildlife Sanctuary. This is the same parking spot as for Flores Peak. To get there, turn on Modjeska Canyon Road from Santiago Canyon Road and follow it around a small jog to the end. If the parking lot is full, there are a few places along the side of Modjeska Canyon Road where you can park. My timing, the middle of summer during a harsh drought, is probably the worst time for a waterfall hike, but it was the best fit for my schedule. I fully expected to notch another dry waterfall and did, but the scenery still made it worthwhile.

Start by going uphill past the gate on Harding Truck Trail, then follow the left junction that descends toward Modjeska Reservoir in less than a half mile. At the bottom, turn right to make your way up Harding Canyon. There is a good use trail that heads into the canyon. It pays to stay on it as long as you can. Before I got far into the canyon, I heard the telltale warning of a rattlesnake under a rock just off the trail. Despite being startled, I appreciated the warning. I tried my best to spot him, but couldn't. After a minute or so trying to locate the snake, I headed back down the trail. I was somewhere close to two miles up the canyon before I crossed water for the first time. The middle part of the canyon has some large boulders and several nice sized pools that had survived. The vegetation grew thick and the use trail started to fade in and out. I often had to duck into a tangle of trees and plants to locate a path. Sections would open up then close again in a tangle of brush. At some point, I required my bug net and kept it on most of the way. Poison oak was around, but wasn't choking the canyon in any one spot. Navigation got increasingly difficult the farther I went, though some parts of the canyon were narrow and left no doubt about the way forward.


A couple of mountain bikers at the Harding Truck Trail gate


Early going in Harding Canyon


Getting a little rougher


First water a couple of miles into the canyon


Boulders

There was a large pool about half a mile before Harding Canyon Falls. Before I got to the pool, I started up a side canyon by mistake that got nasty in a hurry. I was about 200' up the side canyon when I hit a wall of fallen trees and it was clear I was going the wrong way. I got back into Harding Canyon and found the use trail again to great relief. The trail would still fade in and out, but I could usually locate it again. There was plenty of boulder scrambling, climbing over dead trees, and skirting pools and smaller falls. When I found the large pool, it was in bad shape, but recognizable. It is easily bypassed on the right. The canyon steadily gained elevation and started to open up again. Scrambling just past the large pool, I saw a 3' long and 6" wide dead log dislodge and fall about 100' in front of me. It could have just been a coincidence, but I had a growing feeling that something, perhaps something big, was in the canyon with me. For the first time on any hike, I got out my pepper spray and readied it in my right hand, trekking pole in my left. I kept it out all the way to the big falls before I relaxed and put it in my pocket. When I got to the big falls, I was not surprised to find it only a trickle. It is in two tiers, a 30' first tier and about a 10' second tier. A class 3 climb on the left side is required to gain the first tier. The rock was solid and holds were good. I climbed up to the top of the second tier and found a smooth, shaded area for lunch. It occurred to me that it might be possible to drop into the canyon from Harding Truck Trail farther up and descend all the way down. Who knows what secrets the canyon holds far beyond the falls.


Snarl in a side canyon, clearly going the wrong way


The large pool, not so large in summer


Small waterfall on the way


Harding Canyon Falls


Directly below the water flow


Looking down from the first tier


Lunch break at the top of the second tier

After my break, I started back, having to work out the path in reverse. A sharp branch drew blood on my forearm, but no more rattlesnakes turned up. About half way back, I ran into a group of four or five awesome orange flame skimmer dragonflies (Libellula saturata). They kept bumping into each other. Whether that was fighting or romance remains a mystery. Getting to Harding Canyon Falls is not easy and I thought about increasing my subjective difficulty rating above moderate. A few bad navigation choices could make it quite difficult and dangerous, but a stiff moderate seems about right. It is worthy, but not nearly as difficult (or beautiful) as getting to Tanriverdi Falls in Hot Spring Canyon.


Canyon walls from Harding Canyon Falls


Navigating back


Feed me Seymour, feed me


Bright orange flame skimmer


Other Trip Reports:
Harding Falls Hike (The Hikers Way)
Above Harding Canyon Falls