Hiked: 11/13/2015
Distance: 1.4 miles on dirt road and use trail
Summit Elevation: 6433'
Prominence: 673'
Elevation Gain: 510'
Elevation Gain (in Empire State Buildings): 0.40
Round trip time: 1 hour 10 minutes
Recommended water: 16 oz.
Parking/Fees: Free on San Sevaine Road turnout
Difficulty: Easy
I got back from Etiwanda a little faster than planned and had time to knock off Buck Point, a short HPS peak on the way back along San Sevaine Road. While the hike is short, the wrong strategy could lead to a great deal of bushwhacking pain. Thanks to Patrick O'Neill for finding and sharing the best way up. The trailhead is a turn out on the south side of the peak. There used to be a path along the south ridge, but reports over the last couple of years claim it is severely overgrown with ceanothus and rhamnus (buckthorn). The alternative is to head down the road below the summit, then climb a section of class 2+ dirt and boulders to a use trail that can be followed to the summit.
I followed the current best practice. See the first picture for my entry point. I found the use trail behind the large rock wall. Even so, it would not be so easy to follow without the helpful cairns placed at intervals. At the first clearing near the top, I found a seismic monitoring station. The only other place I've seen one of these was on Mount St. Helens. A sign on the solar power panel stated it was an Earth Scope Project, part of the Boundary Plate Observatory. Cool stuff!
But wait, this is not the summit. A little bit north of the station is the register can. I signed in and checked out recent visitors. Buck Point is far less popular than Etiwanda (for good reason!). But wait, this still isn't the summit. The high point can be found further north in a clump of buckthorn that has swallowed the 5' metal marker pole. I flagged it with a waypoint in my GPS track (download from peakbagger.com). I returned along the use trail and scrambled down to the road. A short jog back to the truck and I was done for the day.
Saturday, November 14, 2015
Friday, November 13, 2015
Etiwanda Peak from Joe Elliot Campground
Hiked: 11/13/2015
Distance: 8.4 miles on trail and cross country
Summit Elevation: 8662'
Prominence: 302'
Elevation Gain: 2900'
Elevation Gain (in Empire State Buildings): 2.32
Round trip time: 4 hours 45 minutes
Recommended water: 92 oz.
Parking/Fees: Free at Joe Elliot Campground
Difficulty: Moderate
Etiwanda Peak is a high peak on the eastern side of the Cucamonga Wilderness. Most hikers climb it using a long route from Icehouse Canyon. I wanted to climb it from the other side starting at Joe Elliot Campground. For a few months a year, starting in late Fall, San Sevaine Road (Forest Road 1N34) is open to Joe Elliot. The rest of the time it is closed for mule deer fawning or weather. You can view the official status of the area on this San Bernardino National Forest page. There are no facilities at the camp and no Adventure Pass is required for parking there.
To get to San Sevaine Road, take I-15 to the Sierra Ave exit, then go north about a mile. The dirt road starts on the left and there is a brown sign on the left. I drove the 11+ miles up San Sevaine Road. It starts off in good shape, but is rough in several places higher up, requiring 4x4 and high clearance. The unmaintained trail leaving from Joe Elliot camp (named Cucamonga Peak Trail on caltopo.com) heads up to Etiwanda and goes all the way to Cucamonga Peak. The memorial tree was damaged and taken down many years ago. The trail was in good shape at the beginning, though small plants were making homes in the middle of the trail. It was cold (45F) and gusty winds made it colder. I headed out with a balaclava and gloves.
I passed a gully that could be used as a shortcut going up or coming down. I wanted to see how the old trail was doing so I left the gully for the descent. Past the gully, the trail got harder to follow and I ended up backtracking out of dense buckthorn a few times. There was a lot of dead fall to cope with, although I saw a few tree cuts that looked fairly recent. Still, the middle section of the trail could use some TLC. There was at least one good camping spot about half way up with some left over artifacts. The trail continued on the north side of the Etiwanda ridge where the cold, shade, and wind started to bite again. The north side also had a few long washouts, but they were navigable with a little extra attention.
The top section of trail was pristine, running through a healthy pine forest. There was a dusting of snow across the trail in shady areas, enough to look nice without causing traction problems. The views from the summit were stellar. There was no benchmark that I found, but the register was in a long green plastic tube. After signing in, I took some video but my commentary on the summit was muffled by the harsh wind. The wind was freezing and I didn't bother resting or eating on the summit. Those activities would be much more pleasant on the sunnier slopes out of the wind. I descended from the summit the same way I went up. When I got to the shortcut gully, I decided to follow it down. It was loose and slippery, but not technical. I saved 1.5 miles taking the gully instead of the trail back, but I went a little past the intersection with the trail. The intersections on both sides were camouflaged and I had to check the GPS to get back on track. The rest of the return trip was mellow. I never saw another person the whole day.
Distance: 8.4 miles on trail and cross country
Summit Elevation: 8662'
Prominence: 302'
Elevation Gain: 2900'
Elevation Gain (in Empire State Buildings): 2.32
Round trip time: 4 hours 45 minutes
Recommended water: 92 oz.
Parking/Fees: Free at Joe Elliot Campground
Difficulty: Moderate
Etiwanda Peak is a high peak on the eastern side of the Cucamonga Wilderness. Most hikers climb it using a long route from Icehouse Canyon. I wanted to climb it from the other side starting at Joe Elliot Campground. For a few months a year, starting in late Fall, San Sevaine Road (Forest Road 1N34) is open to Joe Elliot. The rest of the time it is closed for mule deer fawning or weather. You can view the official status of the area on this San Bernardino National Forest page. There are no facilities at the camp and no Adventure Pass is required for parking there.
To get to San Sevaine Road, take I-15 to the Sierra Ave exit, then go north about a mile. The dirt road starts on the left and there is a brown sign on the left. I drove the 11+ miles up San Sevaine Road. It starts off in good shape, but is rough in several places higher up, requiring 4x4 and high clearance. The unmaintained trail leaving from Joe Elliot camp (named Cucamonga Peak Trail on caltopo.com) heads up to Etiwanda and goes all the way to Cucamonga Peak. The memorial tree was damaged and taken down many years ago. The trail was in good shape at the beginning, though small plants were making homes in the middle of the trail. It was cold (45F) and gusty winds made it colder. I headed out with a balaclava and gloves.
I passed a gully that could be used as a shortcut going up or coming down. I wanted to see how the old trail was doing so I left the gully for the descent. Past the gully, the trail got harder to follow and I ended up backtracking out of dense buckthorn a few times. There was a lot of dead fall to cope with, although I saw a few tree cuts that looked fairly recent. Still, the middle section of the trail could use some TLC. There was at least one good camping spot about half way up with some left over artifacts. The trail continued on the north side of the Etiwanda ridge where the cold, shade, and wind started to bite again. The north side also had a few long washouts, but they were navigable with a little extra attention.
The top section of trail was pristine, running through a healthy pine forest. There was a dusting of snow across the trail in shady areas, enough to look nice without causing traction problems. The views from the summit were stellar. There was no benchmark that I found, but the register was in a long green plastic tube. After signing in, I took some video but my commentary on the summit was muffled by the harsh wind. The wind was freezing and I didn't bother resting or eating on the summit. Those activities would be much more pleasant on the sunnier slopes out of the wind. I descended from the summit the same way I went up. When I got to the shortcut gully, I decided to follow it down. It was loose and slippery, but not technical. I saved 1.5 miles taking the gully instead of the trail back, but I went a little past the intersection with the trail. The intersections on both sides were camouflaged and I had to check the GPS to get back on track. The rest of the return trip was mellow. I never saw another person the whole day.
Etiwanda Peak from Joe Elliot Campground from Keith Winston on Vimeo.
Friday, October 30, 2015
Box Springs Mountain and Table BM
Hiked: 10/30/2015
Distance: 6.7 miles on trail
Summit Elevation: 3080' (Box Springs), 2559' (Table BM)
Prominence: 1160' (Box Springs), 309' (Table BM)
Elevation Gain: 1300'
Elevation Gain (in Empire State Buildings): 1.04
Round trip time: 2 hours 20 minutes
Recommended water: 40 oz.
Parking/Fees: $5 Riverside County Parks
Difficulty: Easy
Box Springs Mountain separates Riverside from Moreno Valley and rises prominently along highway 60 in the Inland Empire. On the east side of the mountain is a giant white "M", a symbol for Moreno Valley, and on the west side is a giant yellow-orange "C", a symbol for UC Riverside. Both can be seen from the highway, but the C is only visible briefly. The park is managed by the County of Riverside. Here is a trail map. I chose to start at the main parking lot on the Moreno Valley side. To get there, take highway 60 east from Riverside, take the Pigeon Pass Road exit and turn left (north), then follow it west until it turns into Box Springs Mountain Road and curves back west. Continue past where it turns into a dirt road and ends at the day use dirt parking lot. The dirt road is mellow and any car should be able to make it to the parking lot. There is a $5 parking fee with a single pay slot at the entrance to the lot, no envelopes, no credit cards, and it appears to be on the honor system (you can't get a parking receipt to prove you paid). There is a portable toilet at the lot and a few picnic tables. To avoid the fee, there are several free access trails to the mountain, including the Two Trees Trail and the M Trail.
From the parking lot, I started south past a gate along the wide Box Springs Mountain Road. From the start, you can spot some clusters of radio towers along the ridge. The first couple of clusters are not the high point. As I was catching up to a couple heading the same way, I saw them stop and start to take pictures of the road. When I got there, I saw it was a Western Patch-Nosed snake having a large lizard breakfast. She may have bitten off more than she could chew. I took a photo, then continued past them to the radio cluster at the high point. The wind was blowing like crazy, kicking dirt in my face and knocking me sideways. I turned my hat backward to try to keep it from blowing away. I hunted for a benchmark at the top of Box Springs Mountain, but found nothing but some graffiti. Eventually, I gave up on the benchmark and continued past the high point to the end of the ridge to get a close up view of the giant "M". I jogged most of the way back to the parking lot, passing a few hikers and one biker to get ready for the second part of the hike. The round trip for this segment was 5 miles and took about 75 minutes.
Table BM looked fairly close to the parking lot, but in the opposite direction of Box Springs Mountain. I could see a trail heading in that direction from the road, so I took it. The unsigned trail aimed straight for the summit. Along the way were many boulders, most with graffiti. It's a sad reality, but not unexpected for a mountain in the middle of Inland Empire sprawl. The high point was a large class 2 block and it looked like the benchmark had been dug out of the soft sandstone. Someone carved a heart into the top. I went over the summit block and onto a table-like boulder, also decorated with graffiti. Back on the summit, I noticed what looked like a marker on the top of a nearby boulder. The boulder with the benchmark was about 10' with an 8" vertical crack. I tried the crack a couple of times without luck, then found a different class 3 way up using sloper holds a little to the left. After getting down, I tried the crack again, finding that a foot jam was all I needed to get started. I ended up climbing the crack twice. The intact benchmark on the boulder was a reference mark pointing to the high point with the missing benchmark. I hit a couple of other boulders on the way back that proved to be easier. It was a short, but fine morning of urban hiking.

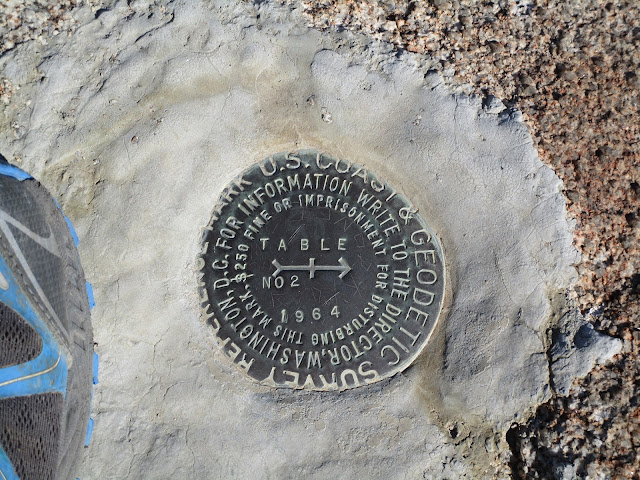
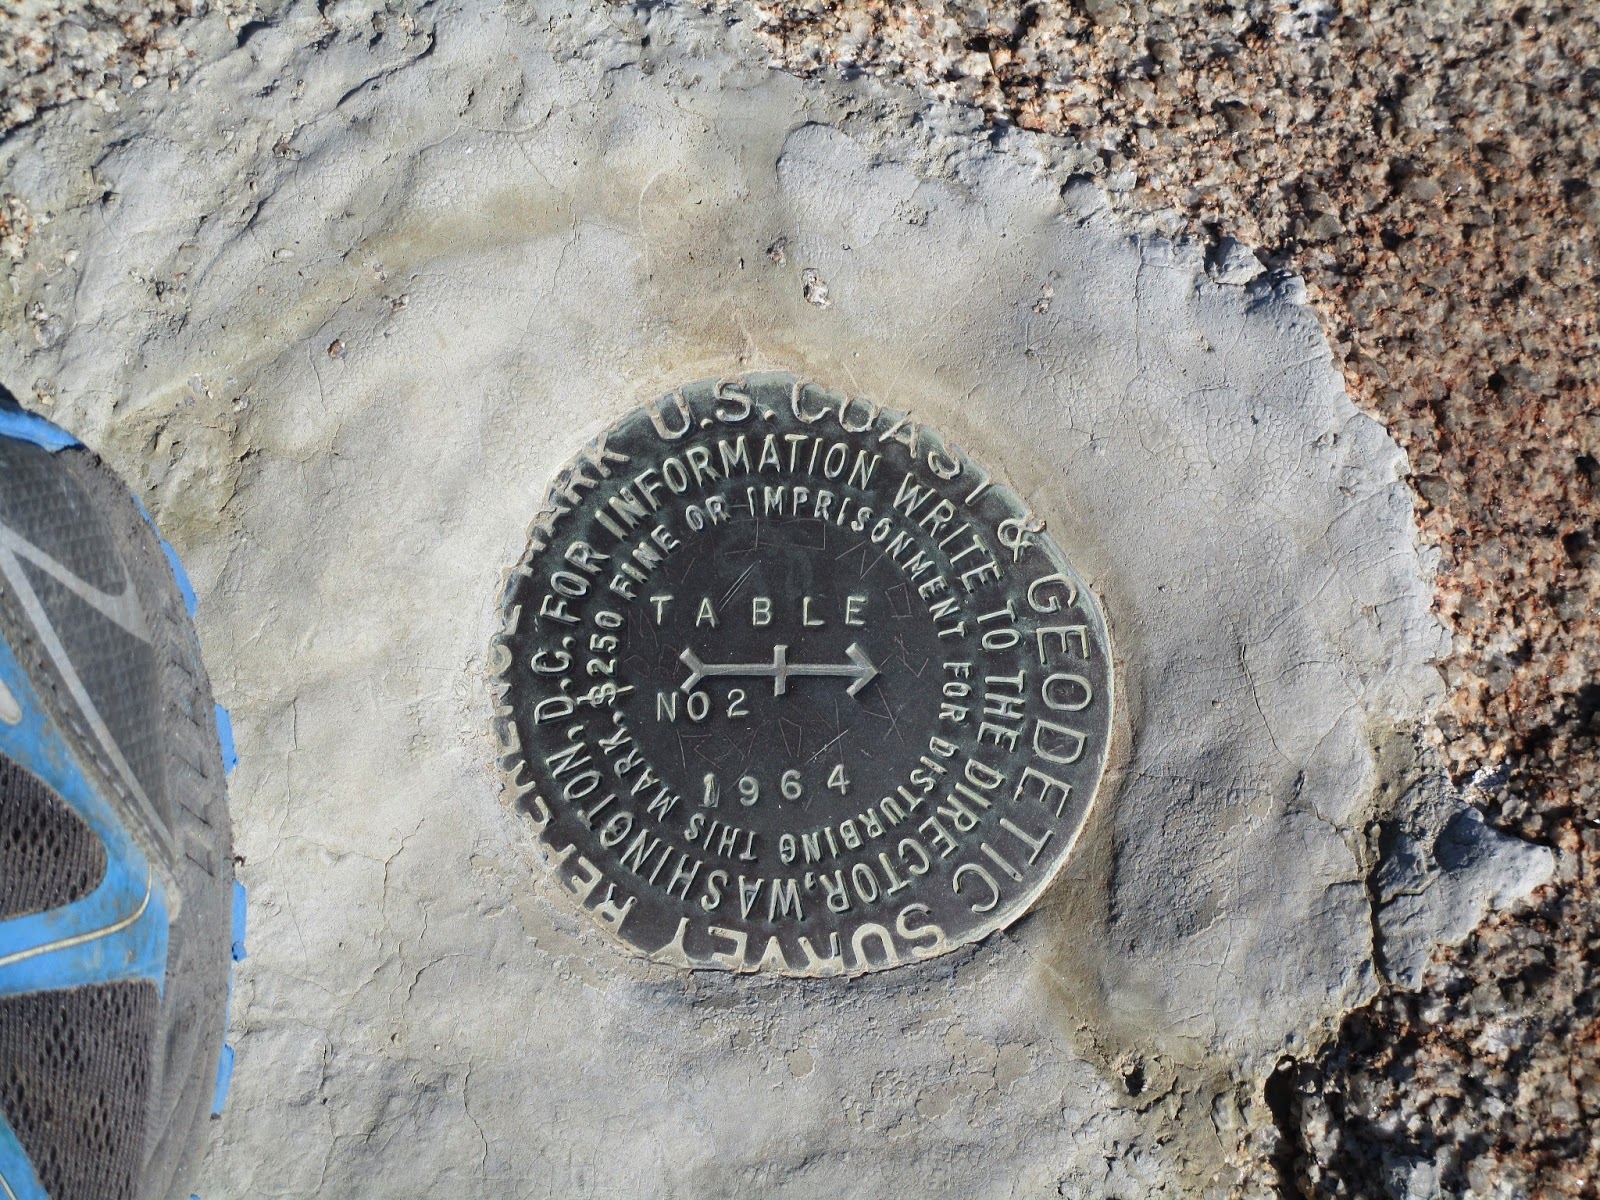
Table Reference Mark #2 on top of the boulder,
probably still intact because it's not as easy to climb as the true summit
Table BM Photosphere
Distance: 6.7 miles on trail
Summit Elevation: 3080' (Box Springs), 2559' (Table BM)
Prominence: 1160' (Box Springs), 309' (Table BM)
Elevation Gain: 1300'
Elevation Gain (in Empire State Buildings): 1.04
Round trip time: 2 hours 20 minutes
Recommended water: 40 oz.
Parking/Fees: $5 Riverside County Parks
Difficulty: Easy
Box Springs Mountain separates Riverside from Moreno Valley and rises prominently along highway 60 in the Inland Empire. On the east side of the mountain is a giant white "M", a symbol for Moreno Valley, and on the west side is a giant yellow-orange "C", a symbol for UC Riverside. Both can be seen from the highway, but the C is only visible briefly. The park is managed by the County of Riverside. Here is a trail map. I chose to start at the main parking lot on the Moreno Valley side. To get there, take highway 60 east from Riverside, take the Pigeon Pass Road exit and turn left (north), then follow it west until it turns into Box Springs Mountain Road and curves back west. Continue past where it turns into a dirt road and ends at the day use dirt parking lot. The dirt road is mellow and any car should be able to make it to the parking lot. There is a $5 parking fee with a single pay slot at the entrance to the lot, no envelopes, no credit cards, and it appears to be on the honor system (you can't get a parking receipt to prove you paid). There is a portable toilet at the lot and a few picnic tables. To avoid the fee, there are several free access trails to the mountain, including the Two Trees Trail and the M Trail.
From the parking lot, I started south past a gate along the wide Box Springs Mountain Road. From the start, you can spot some clusters of radio towers along the ridge. The first couple of clusters are not the high point. As I was catching up to a couple heading the same way, I saw them stop and start to take pictures of the road. When I got there, I saw it was a Western Patch-Nosed snake having a large lizard breakfast. She may have bitten off more than she could chew. I took a photo, then continued past them to the radio cluster at the high point. The wind was blowing like crazy, kicking dirt in my face and knocking me sideways. I turned my hat backward to try to keep it from blowing away. I hunted for a benchmark at the top of Box Springs Mountain, but found nothing but some graffiti. Eventually, I gave up on the benchmark and continued past the high point to the end of the ridge to get a close up view of the giant "M". I jogged most of the way back to the parking lot, passing a few hikers and one biker to get ready for the second part of the hike. The round trip for this segment was 5 miles and took about 75 minutes.
Table BM looked fairly close to the parking lot, but in the opposite direction of Box Springs Mountain. I could see a trail heading in that direction from the road, so I took it. The unsigned trail aimed straight for the summit. Along the way were many boulders, most with graffiti. It's a sad reality, but not unexpected for a mountain in the middle of Inland Empire sprawl. The high point was a large class 2 block and it looked like the benchmark had been dug out of the soft sandstone. Someone carved a heart into the top. I went over the summit block and onto a table-like boulder, also decorated with graffiti. Back on the summit, I noticed what looked like a marker on the top of a nearby boulder. The boulder with the benchmark was about 10' with an 8" vertical crack. I tried the crack a couple of times without luck, then found a different class 3 way up using sloper holds a little to the left. After getting down, I tried the crack again, finding that a foot jam was all I needed to get started. I ended up climbing the crack twice. The intact benchmark on the boulder was a reference mark pointing to the high point with the missing benchmark. I hit a couple of other boulders on the way back that proved to be easier. It was a short, but fine morning of urban hiking.
Table Reference Mark #2 on top of the boulder,
probably still intact because it's not as easy to climb as the true summit
Friday, October 23, 2015
Slide Mountain Lookout
Hiked: 10/23/2015
Distance: 9 miles on trail and use trail
Summit Elevation: 4631'
Prominence: 631'
Elevation Gain: 2800'
Elevation Gain (in Empire State Buildings): 2.24
Round trip time: 3 hours 30 minutes
Recommended water: 72 oz.
Parking/Fees: Adventure Pass
Difficulty: Moderate
Some of the mountains on the Lower Peaks list are far north of Los Angeles. Living in south Orange County, that means there is an ocean of cars between me and those mountains. The tides of that ocean play havoc with the logistics of day hiking those peaks. Low tide on the L.A. freeways is generally between 8:30 PM and 5:30 AM, meaning I need to get north of the city before 5:30 AM or spend 2-3 additional hours sitting in traffic. That long introduction was to explain why I started the Slide Mountain hike in the dark, and why many hikes of distant peaks start in the dark. Logistics.
The trailhead starts near Frenchman's Flat Campground, where old highway 99 is blocked. Parts of highway 99 were replaced by I-5. The southern terminus of highway 99 is now at Wheeler Ridge. This is a rare hike that starts in the Angeles National Forest and ends in the Los Padres National Forest. The main route heads about 1.5 miles up the abandoned highway, then turns left onto the Slide Peak trail. There was one other vehicle parked at the trailhead when I arrived, but it appeared lifeless. I took off around 6:00 AM, about an hour before sunrise. I could hear, but not see, Piru creek flowing below me on the right side. When I got to the Slide Mountain trail, it was still dark. The trail started out wide, but eventually narrowed to a single track. As the sun rose, I could finally see the stratified geology of the area and Pyramid Lake below. The sun played some interesting tricks on the rocks.
At the saddle, the trail turned right and there were a few switchbacks on the right side before the trail curled around left of the summit. I didn't see the lookout tower until I was very near the top. The tower is not very high, but it doesn't have to be at that vantage point. The stairs were not locked so I could walk around the top of the tower and take in the excellent views of Los Padres. I was impressed with this angle on Cobblestone. The benchmark is intact, and the register sits just below a more formal sign in sheet for hikers. I put my signature to both. Under the tower I found a chest labelled WATER and indeed there were half a dozen bottles of water inside. A sign on the tower indicated they were looking for hikers to volunteer as lookouts. There is also a portable restroom at the top. Everything looked well maintained.
Instead of returning along the trail, I headed over to Peak 4618, then cross country down to the trail. The vegetation was a little thicker than expected so I may not have saved much time. Back on the trail, I jogged down to the saddle. From there, I struck out along the firebreak, planning to take the ridge back. This was far more interesting than returning on the trail. The firebreaks and use trail were usually easy to follow, but there were a few places where they faded out. 1400' of descent came in the last mile and was sharply steep in places. I had to hunt around to find a way to descend from the final bump without going a half mile out of my way down a more gentle slope. The last obstacle was getting over Piru Creek, which left my feet wet for the drive to Saddleback Butte. I hardly thought about my feet, though, having enjoyed Slide Mountain from start to finish.
Slide Mountain Photosphere
Would you like to know more...?
Distance: 9 miles on trail and use trail
Summit Elevation: 4631'
Prominence: 631'
Elevation Gain: 2800'
Elevation Gain (in Empire State Buildings): 2.24
Round trip time: 3 hours 30 minutes
Recommended water: 72 oz.
Parking/Fees: Adventure Pass
Difficulty: Moderate
Some of the mountains on the Lower Peaks list are far north of Los Angeles. Living in south Orange County, that means there is an ocean of cars between me and those mountains. The tides of that ocean play havoc with the logistics of day hiking those peaks. Low tide on the L.A. freeways is generally between 8:30 PM and 5:30 AM, meaning I need to get north of the city before 5:30 AM or spend 2-3 additional hours sitting in traffic. That long introduction was to explain why I started the Slide Mountain hike in the dark, and why many hikes of distant peaks start in the dark. Logistics.
The trailhead starts near Frenchman's Flat Campground, where old highway 99 is blocked. Parts of highway 99 were replaced by I-5. The southern terminus of highway 99 is now at Wheeler Ridge. This is a rare hike that starts in the Angeles National Forest and ends in the Los Padres National Forest. The main route heads about 1.5 miles up the abandoned highway, then turns left onto the Slide Peak trail. There was one other vehicle parked at the trailhead when I arrived, but it appeared lifeless. I took off around 6:00 AM, about an hour before sunrise. I could hear, but not see, Piru creek flowing below me on the right side. When I got to the Slide Mountain trail, it was still dark. The trail started out wide, but eventually narrowed to a single track. As the sun rose, I could finally see the stratified geology of the area and Pyramid Lake below. The sun played some interesting tricks on the rocks.
At the saddle, the trail turned right and there were a few switchbacks on the right side before the trail curled around left of the summit. I didn't see the lookout tower until I was very near the top. The tower is not very high, but it doesn't have to be at that vantage point. The stairs were not locked so I could walk around the top of the tower and take in the excellent views of Los Padres. I was impressed with this angle on Cobblestone. The benchmark is intact, and the register sits just below a more formal sign in sheet for hikers. I put my signature to both. Under the tower I found a chest labelled WATER and indeed there were half a dozen bottles of water inside. A sign on the tower indicated they were looking for hikers to volunteer as lookouts. There is also a portable restroom at the top. Everything looked well maintained.
Instead of returning along the trail, I headed over to Peak 4618, then cross country down to the trail. The vegetation was a little thicker than expected so I may not have saved much time. Back on the trail, I jogged down to the saddle. From there, I struck out along the firebreak, planning to take the ridge back. This was far more interesting than returning on the trail. The firebreaks and use trail were usually easy to follow, but there were a few places where they faded out. 1400' of descent came in the last mile and was sharply steep in places. I had to hunt around to find a way to descend from the final bump without going a half mile out of my way down a more gentle slope. The last obstacle was getting over Piru Creek, which left my feet wet for the drive to Saddleback Butte. I hardly thought about my feet, though, having enjoyed Slide Mountain from start to finish.
Slide Mountain Photosphere
Would you like to know more...?
Subscribe to:
Posts (Atom)